
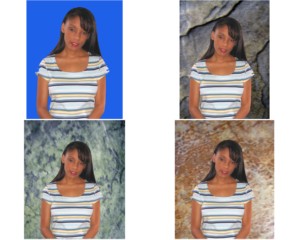
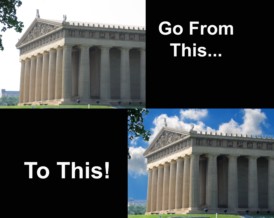
How to Use Digital Backdrops 1st Take your image against a green or blue screen. Green screen or blue screens or backdrops works best because they are made specifically for this type process. As they separate the subjects tone from the contrasting color. If you do not have blue or green screen, any solid color such as white will work although not as well. You will some times get a haze around your subject. 2nd Save the image to your hard drive and open it in Photoshop 3rd Use the magic wand mask utility to mask the green or blue area 4th Cut the masked area out. Then re-mask the white area . 5th Open one of our digital backdrops in the same screen. 6th Using the selector tool, drag the masked image over the backdrop image and position and or size it to fit. (You may have to re-mask the white area at this point) then hit cut to reveal the backdrop underneath. 7th Clean up any rough edges with the eraser tool or rubber stamp tool by cloning or erasing. 8th You may now place this image on any other backdrop on the CD that you wish,( it is a good idea to do several and let your customer have a choice). Then print your photo and��.. You are FINISHED! All programs use this same basic system some may vary slightly. |


We guarantee every order and every product we offer for your satisfaction If there are any problems with any order, or you are not satisfied in any way we will refund your purchase price on return of the product with in 30 days of purchase, minus a 20% restocking fee and any shipping costs |
Call (615) 977-1073 |

To use these Backdrops you need photo editing software. Below we have links to FREE, Sharware and Demo programs to help you get stared in editing your photos |
Look Below For Free Software |